Matching Glass and Metal Thermal Expansion Rates Key to Accuracy of Largest Telescope
Case Studies
Unique Design Eliminates Stresses, Supports Weight, Permits Fabrication of Mammoth, Fragile Mirror
When Japan's Subaru telescope starts tracking the universe from the summit of Hawaii's 14,000-ft. Mauna Kea, it expects to have a viewing accuracy or resolving power of 0.2 arcseconds. That means, essentially, that it will be able to pinpoint from Tokyo an object the size of a baseball atop Mt. Fuji, a distance of 100 km.
The Subaru, under construction now for National Astronomical Observatory of Japan, will be the largest, optical-infrared telescope in the world. It is scheduled to begin star gazing in the year 2000, and operate as a common-use facility for astronomists worldwide.
Problems tend to be particularly complex in designing and building a mammoth telescope like this one, reports Contraves Brashear Systems, L.P.,Inc., Pittsburgh, PA, specialist in high-precision optical instrumentation who is responsible for fabricating optics.
Of primary concern was the mammoth glass blank to serve as the primary mirror. It is the largest single telescope optic ever made. This single structure weighs 33 tons, measures 8.31 meters (27.24 ft.) in diameter, yet has a thickness of only 20 cm (8 inches) in shape (convex on one side and concave on the opposite side.)
As a solid blank, the huge mirror was very fragile, having a 40.1 ratio of diameter to thickness. In addition, it would be difficult to fabricate such a massive single-unit reflecting surface and achieve the highly precise shape required.
The observatory needed a mirror blank that would be uniform, rigid and have the smallest possible coefficient of thermal expansion (CTE) to prevent deformation during variations in ambient temperature. To fulfill this requirement, Corning Glass Works, Canton, NY, made the giant disk of an ultra-low-expansion (ULE) glass.
Mirror Support System
To maintain an accurate shape during observation, an active mirror support system has been developed employing 261 actuators and high-precision load sensors. The load sensors will monitor deformation of the mirror due to gravity when the telescope tilts. A control computer will analyze that information, then drive the actuators to compensate for any distortion of the mirror every tenth of a second. A sophisticated measurement system will also analyze the stellar images every 10 seconds to further maintain an ideal reflector surface.
At the top of each actuator in the mirror support system, imbedded in the glass disk, are 261 specially designed sleeves made of Super Invar 32-5 alloy, a specialty alloy from Carpenter Technology Corp., Reading, PA, designed to provide minimum thermal expansion at ambient temperatures. This material was selected to minimize the difference between the CTE's of the glass and the alloy.
Carpenter Super Invar 32-5 alloy is a solid solution alloy contain- ing iron, nickel and cobalt. It can be heat treated for lowest thermal expansion and optimal stability, and has been commonly used for structural components in optical and laser systems requiring precision measurements.
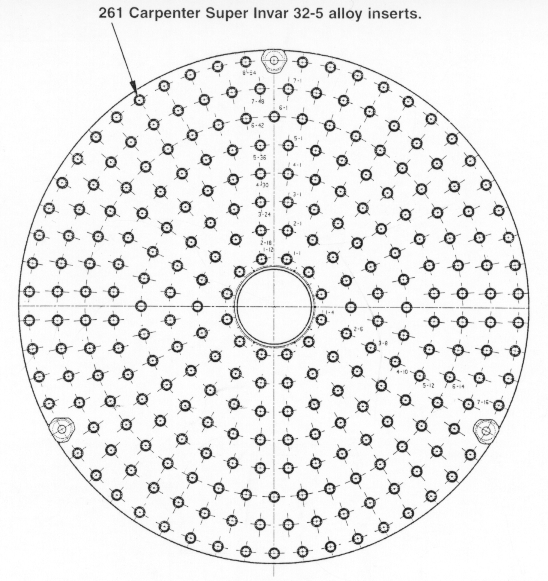
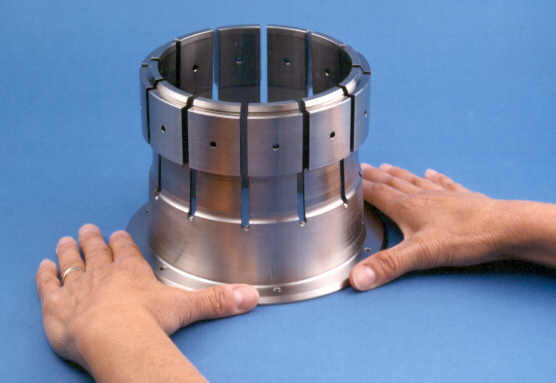
To accommodate the Super Invar sleeves, Contraves pocket-bored 261 holes at equidistant points (Fig. 1) around the back side of the mirror. The sleeves, with 12 vertical, peripheral slots and fingers (Fig. 2) to relieve radial stresses, were machined individually to provide a radial clearance fit of 0.004" to 0.006" between each sleeve and target glass hole. An epoxy was then applied to bond each sleeve to the hole for which it was sized.

Fig.1 - This drawing shows the 8.3-meter primary morror with 261 Carpenter Super Invar 32-5 alloy inserts geometrically arranged in as many glass holes.

Fig. 2 - One of the Carpenter Super Invar 32-5 alloy sleeves, after nickel plating, ready for insertion in thte primary mirror bank.
In a test environment, with a 50°F change in temperature, the Super Invar sleeves have exhibited a surface distortion rate of only 0.44x10⁻⁶ inches P-V. This design effectively eliminates radial stresses - which could break or distort the mirror - leaving nothing more consequential than minor, local stresses from bonding.
Alloy Sleeve Fabrication
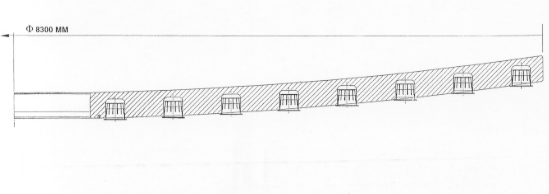
Carpenter supplied 7-1/4"-dia. hollow bars of Super Invar 32-5 alloy in 62" lengths to Contraves Brashear for fabrication into sleeves of 5.945" nominal dia. by 5.109" deep (Fig. 3). The specialty metals producer double melted the alloy to assure good structural integrity and a predictable CTE.

Fig. 3 - Cutaway shows relative positioning of the Carpenter Super Invar 32-5 alloy sleeves in the back of the mirror, and the squareness to horizontal of each faceplate through the mirror's curvature.
To make each sleeve, Contraves Brashear cut sections from the cylindrical hollow bars; rough machined five different diameters, including slots, fingers and holes; stress relieved by a proprietary process; finish machined; stress relieved again and finally, applied an electroless nickel plating of 0.0005" thickness to provide corrosion resistance. When finished, each Super Invar sleeve weighed 5.7 lbs.
The sleeves, which support the giant mirror, rest on an equivalent number of tapered balls made of chrome-nickel-moly steel. The surface of each ball is galvanized to protect the thin nickel coating on the sleeve.
These tapered balls take the enormous load when the telescope and mirror are turned to track an object in the sky. With 200 lbs. of force resting on the flange of each ball, the force is evenly distributed. All of the tapered balls are anchored to actuators which, with integral springs, cushion the load, control the mirror surface and adjust continuously to provide the precise optics needed.
Other Mirrors
The telescope is also equipped with a secondary mirror, which receives reflected light from the primary mirror, and a tertiary mirror, which reflects light into the Couteau system for analysis.
Fifteen Super Invar sleeves, slightly smaller than those in the primary mirror, are inserted in each of three interchangeable secondary mirrors that are 1.3 to 1.4 meters (about 3.28 ft.) in diameter. Eight somewhat shorter Super Invar sleeves are employed as inserts in the much smaller tertiary mirror. All of these inserts are used to provide a uniform CTE between glass and metal, and reduce stresses caused by gravity and temperature variations.
Three alloy pads, about three times the size of the primary mirror inserts, are located at three points around the circumference of the mirror (Fig. 1). These pads, bonded to a structural member on the back of the mirror, support the total weight of the mirror. The pads also provide thermal equilibrium with the glass.
From now until the telescope is placed in service, Contraves Brashear will be grinding, polishing and testing the massive primary mirror at its large optical fabrication facility in Wampum, PA. This work is done in a converted, subterranean limestone mine at a constant temperature of 70 oF, and in an environment free of thermal vibration.
Polishing and grinding the mirror blank is accomplished by state-of-the-art computer-controlled equipment. A rotating table under the glass disk positions it for precise operation of a Scheiss vertical boring mill with diamond cutter, grinding wheel and lapping head. A solution of aluminum oxide and water is used for abrasive grinding. Pitch and cerium, then a cerox polishing compound are utilized in polishing.
Contraves Brashear must achieve exactly the right geometrical pattern in its grinding and polishing process to get the configuration and surface smoothness needed for tight star images. It must polish to a finish of 0.03 to 0.05 RMS, and achieve a reflecting surface that is within 1/2 micron wave length of light of the ideal shape.
The Subaru is one of three new generation telescopes currently under construction. The other 8-m class telescopes are the VLT of the European Southern Observatory and GEMINI of the US-IK consortium. The Subaru is being built on Mauna Kea at the invitation of the University of Hawaii.