White Papers
A crucial step in maximizing the corrosion resistance of stainless-steel workpieces, passivation forms an extremely thin, protective oxide surface film. But it must be done properly.
Passivation of machined stainless-steel parts, correctly per formed, maximizes corrosion resistance. Incorrectly performed, it can actually induce corrosion. Correct passivation can make the difference between premature failure and satisfactory performance. At the very least, it can be an insurance policy.
What, exactly, is passivation? It is simply a post-fabrication process that increases the resistance inherent in the particular grade of stainless steel from which the part was produced. Not everyone agrees on the details of how passivation works. But it is certain that a protective oxide film is present on the surface of passive stainless steel. This film is considered to be quite thin, almost 0.0000001 inch thick, or about a hundred thousand times thinner than a human hair. It is not like a coat of paint, though for many practical purposes it may appear to behave as such.
A clean, freshly machined stainless part automatically acquires this oxide film from exposure to oxygen in the atmosphere. In actual practice, however, contaminants such as shop dirt or particles of iron from cutting tools on the surface may reduce the effectiveness of the natural film. When this happens, corrosive attack may begin.
The machining process itself can embed free iron into the surface of the part. A microscopic amount of metal, worn off the cutting tool, may be transferred to the stainless parts. Small particles of iron-containing shop dirt may also adhere to the stainless-steel surface. Though the metal may appear shiny in the as- machined condition, the invisible particles of free iron can cause a thin coating of rust to appear on the surface after exposure to the atmosphere. This is generally caused by corrosion of the tool steel and not the parent metal. Sometimes the crevice at the embedded tool steel particle or its corrosion products may cause attack of the part itself. These problems can be avoided by immersion in a passivating bath containing nitric acid that is capable of dissolving the tool steel (free iron).
Sulfides are another potential problem. They result from the addition of sulfer to free-machining stainless steels to increase machinability. Sulfides improve the alloy's ability to form chips that break away cleanly from the cutting tool during the machining process. But unless the stainless steel is properly passivated sulfides can form initiation sites for localized attack on the surface of the fabricated part. One purpose of passivating a sulfer-containing alloy is to remove sulfides present at the metal surface.
In both cases, passivating can achieve the overall objective-maximize the already inherent corrosion resistance of the stainless steel.
A two-step procedure can provide the best possible corrosion resistance: (1) cleaning, a fundamental but sometimes overlooked operation; and (2) an acid bath, or passivating treatment.
Cleaning: A Must
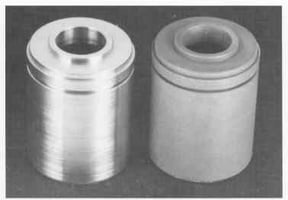
Cleaning the workpiece thoroughly of grease, coolant or other shop debris is essential to obtain the best corrosion resistance. A machinist might mistakenly skip this step, thinking that by simply immersing the grease-laden part in a nitric acid bath, both cleaning and passivating will take place simultaneously. In reality, the contaminating grease reacts with the acid to form gas bubbles. These bubbles collect on the surface of the workpiece and interfere with passivation. Worse yet, contamination of the passivating solution (with high levels of chlorides, for example) can cause "flash attack" as shown in Fig. 1.
Instead of obtaining the desired oxide film with a shiny, clean, corrosion-resisting surface, the flash attack, causes a grey or black appearance and deterioration of the surface that passivation is designed to optimize.
The first stage to successful passivation, therefore, is: Wipe the part clean of any large machining chips or other shop debris. Then use a commercial degreaser or cleanser to rid the part's surface of machining oils or coolants. (Foreign matter such as thermal oxides may have to be removed mechanically, by grinding; or chemically, by methods such as acid pickling.)
Fig. 1. The price of contaminated passivating solution, "flash attach" takes its toll on part at right. This contrasts sharply with clean, shiny, corrosion-resistant surface on part at left that attests to proper passivating. Passivating
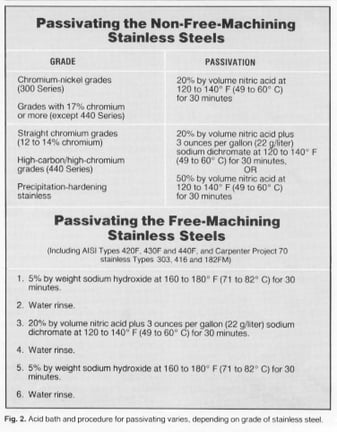
Cleaned properly, the work piece is now ready for immersion in the passivating acid bath. As seen in Fig. 2, composition of the acid bath depends upon the grade of stainless steel.
More-resistant grades can be passivated in 20-percent nitric acid without sodium dichromate. Sodium dichromate, or an increased concentration of nitric acid, is used for less-resistant materials to reduce the chance of undesirable flash attack.
The procedure for passivating free-machining stainless steels is somewhat different from that used for non-free-machining grades. That is because sulfides of sulfer-containing free-machining grades, that are totally or partially removed during passivation, create microscopic discontinuities in the surface of the machined part. Even normally efficient water rinses can leave residual acid trapped in these discontinuities after passivation. This acid can then attack the surface of the part unless it is neutralized or removed. For this reason, a special passivation process is required for free-machining grades.
the A-A-A Method
The A-A-A (alkaline-acid-alkaline) method developed by Carpenter Technology neutralizes trapped acid and is accomplished in less than two hours. For free-machining grades: After degreasing, soak the parts for 30 minutes in a 5-percent solution of sodium hydroxide at 160 to 180 degrees F. Then rinse the part thoroughly in water. Next, immerse the part for 30 minutes in a 20-percent nitric acid solution containing 3 ounces per gallon of sodium dichromate at 120 to 140 degrees F. After removing the part from this bath flush it with water, then immerse it in the sodium hydroxide solution for another 30 minutes. Rinse the part again with water and dry it; passivation is now complete.
The benefits of using the A-A-A method are demonstrated in Fig. 3. Ground cross-section samples of Type 303 were exposed to a 5-percent salt spray for 24 hours (95 degrees F). The sample passivated only in nitric acid with sodium dichromate was severely rusted due to acid retention where sulfides had been removed. The A-A-A sample was essentially free from rust because retained acid was neutralized. The as- ground sample, top right, (not passivated) displayed only light rust, probably because there was not much opportunity for shop dirt (containing free iron) to contact the machined surface.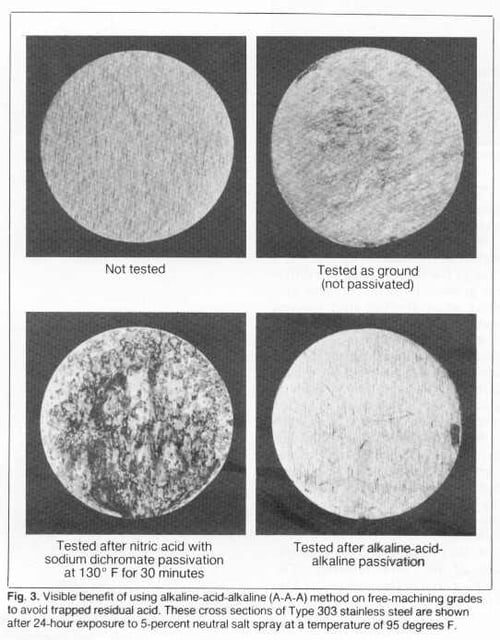
Testing the Passivated Part
Tests are often performed to evaluate the passivated surface. The question to be answered is, "Did passivation remove free iron and optimize the corrosion resistance of the free-machining grades?"
It is important that the test method be matched to the grade under evaluation. A test that is too severe will fail even good material, while one that is too lenient will allow unsatisfactory parts to pass.
The 400 series-precipitation, hardening and free-machining stainless steels are best evaluated in a cabinet capable of maintaining 100-percent humidity at 95 degrees F for 24 hours. The cross section is usually the most critical surface, particularly for free-machining grades.
One reason for this is that sulfides, elongated in the direction of working, intersect this surface.
Critical surfaces should be positioned upward, but at 15 to 30 degrees from the vertical to allow any moisture to run off. Material that has been properly passivated will be virtually free of rust (light staining may occur ).
Austenitic non-free-machining grades may also be evaluated in the humidity test. However, a more rapid method is available using a solution from ASTM A380, Standard Recommended Practice for Cleaning and Descaling Stainless Steel Parts, Equipment and Systems. This test consists of swabbing the part with a copper sulfate/sulfuric acid solution, maintaining wetness for six minutes and observing if there is any plating of copper. Alternately, the part may be immersed in the solution for six minutes.
Copper plating occurs if iron is dissolved. The copper sulfate solution is prepared by first adding 1 cm3 of sulfuric acid (reagent grade, specific gravity 1.84) to 250 cm3 of distilled cold water, and into this dissolving 4 grams of copper sulfate. After several samples fail by copper plating, the solution should be renewed. (Caution: This test must not be applied to surfaces of items for use in food processing.)
While this test is rapid, care must be taken to avoid invalid results. Both the solution and the sample must be at room temperature. It is suggested that the sample be handled with clean, plastic-coated tongs. Immersed samples should be supported so that the test solution has easy access to the entire surface area.
Historically, the 5-percent salt-spray test at 95 degrees F has also been used to evaluate passivated samples. The test is too severe for some grades and is generally not necessary to confirm that passivation has been effective. As shown at the bottom in Fig. 3, however, it has been used for 300 series stainless steels. (Additional information about cleaning and inspection techniques can be found in ASTM A380.)
Do's and Don'ts
Finally, some do's and don'ts about passivating:
- Do avoid chlorides. When possible, use only a good grade water containing less than about 50 parts per million (ppm) of chlorides. Tap water is usually adequate, but it should not contain more than several hundred ppm of chlorides, since this element tends to cause undesirable flash attack.
- Do maintain definite schedules for solution replacement to minimize the possibility of contamination. This is especially necessary during high-production runs. It is a good idea to use a control sample to test the bath's effectiveness. If the sample is attached, it is time to change the bath
- Do passivate only one high-carbon or free-machining grade at a time in the bath. Mixing two different grades can invite corrosion at a point where the two steel surfaces make contact.
- Do remember that attack can occur in a passivating bath if parts are improperly heat-treated. High- carbon/high-chromium martensitic grades must be hardened to render them corrosion-resistant.
- Don't passivate stainless-steel parts that have been carburized or nitrided. Alloys so treated may have their corrosion resistance lowered the point where the stainless steel can be attacked in the passivating tank.
- Do check nitric acid concentration of the bath regularly. The simple titration test outlined in Fig. 4 may be used.
***
By Terry DeBold
Specialist - Corrosion, Welding & Joining
Carpenter Technology Corporation
Reading, PA
USA