White Papers
|
Passivation remains a critical step in maximizing the essential corrosion resistance of parts and components machined from stainless steels. It can make the difference between satisfactory performance and premature failure. Incorrectly performed, passivation can actually induce corrosion.
The process of passivation is sometimes misunderstood. It is a post-fabrication method of maximizing the inherent corrosion resistance of the stainless alloy from which the workpiece was produced. It is not a scale removal treatment, nor anything like a coat of paint.
There is no universal agreement on the precise mechanics of how passivation works. But it is certain that a protective oxide film is present on the surface of passive stainless steel before it is fabricated. This invisible film is considered to be extremely thin, almost 0.0000001-inch thick – which is about 100,000 times thinner than a human hair!
A clean, freshly machined, polished or pickled stainless steel part automatically acquires this oxide film from exposure to oxygen in the atmosphere. Under ideal conditions, this protective oxide film completely covers all surfaces of the part. |
Passivation is designed to maximize the inherent corrosion resistance of stainless steel parts after machining. |
|
In actual practice, however, contaminants such as shop dirt or particles of iron from cutting tools may be transferred to the surface of the stainless steel parts during machining. If not removed, these foreign particles can reduce effectiveness of the original protective film. When this happens, corrosive attack may begin.
During the machining process, a microscopic amount of free iron may be worn off the cutting tool and transferred to the surface of the stainless steel workpiece. Under certain conditions, a thin coating of rust may appear on the part. This is actually corrosion of the tool steel and not the parent metal. Sometimes the crevice at the embedded tool steel particle or its corrosion products may cause attack of the part itself.
Similarly, small particles of iron-containing shop dirt may adhere to the stainless part surface. Although the metal may appear shiny in the as-machined condition, the invisible particles of free iron can lead to rusting on the surface after exposure to the atmosphere.
Exposed sulfides also can be a problem, if not taken into consideration. They come from the addition of sulfur to stainless steels to improve machinability. Sulfides improve the alloy’s ability to form chips that break away cleanly from the cutting tool during the machining process. Unless the part is properly passivated, sulfides can act as initiation sites for corrosion on the surface of the fabricated product.
In both cases, passivation is needed to maximize the natural corrosion resistance of the stainless steel. It can remove surface contamination, such as particles of iron-containing shop dirt and iron particles from cutting tools that can form rust or act as initiation sites for corrosion. In addition, passivation also can remove sulfides exposed on the surface of free-machining stainless alloys, which also may act as initiation sites for corrosion.
A two-step procedure can provide the best possible corrosion resistance – (1) cleaning, a fundamental, but sometimes overlooked procedure and (2) an acid bath, or passivating treatment. Cleaning FirstCleaning should always come first. Grease, coolant or other shop debris must be thoroughly cleaned from the surface to obtain the best possible corrosion resistance. Machining chips or other shop dirt can be wiped carefully off the part. A commercial degreaser or cleanser may be used to clean off machining oils or coolants. Foreign matter such as thermal oxides may have to be removed by grinding, or by methods such as acid pickling. Sometimes a machine operator might skip the basic cleaning, assuming erroneously that by simply immersing the grease-laden part in an acid bath, both cleaning and passivating will take place simultaneously. That doesn't happen. Instead, the contaminating grease reacts with the acid to form gas bubbles. These bubbles collect on the surface of the workpiece and interfere with passivation.
|
|
|
Even worse, contamination of the passivating solution, sometimes with high levels of chlorides, can cause "flash attack" as shown in Fig. 1. Instead of obtaining the desired oxide film with a shiny, clean, corrosion-resisting surface, the flash attack causes a heavily etched or darkened surface - a deterioration of the very surface that passivation is designed to optimize.
Parts made from martensitic stainless steels (which are magnetic, with moderate corrosion resistance and capable of yield strengths up to about 280 ksi [1930 MPa]) are hardened at a high temperature and then tempered to secure the hardness and mechanical properties desired. Precipitation hardenable alloys (which offer a better combination of strength and corrosion resistance than the martensitic grades) may be solution treated, partially machined, aged at lower temperatures, followed by finish machining.
|
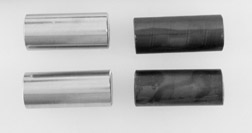 Fig. 1 - The parts on the left have clean, shiny, corrosion-resistant surfaces after proper passivating. The parts on the right exhibit "flash attack" after treatment in a contaminated passivating solution. |
|
In such cases, the parts must be thoroughly cleaned with a degreaser or cleanser to remove any traces of cutting fluid before heat treating. Otherwise, cutting fluid remaining on the parts will cause excessive oxidation. This condition can result in undersize parts with a pitted finish after the scale is removed by acid or abrasive methods. If cutting fluids are allowed to remain on parts that are bright hardened, as in a vacuum furnace or protective atmosphere, surface carburization may occur, leading to a loss of corrosion resistance. Passivating BathsAfter thorough cleaning, the stainless steel part or component is ready for immersion in a passivating acid bath. In current practice, any one of three approaches can be used – nitric acid passivation, nitric acid with sodium dichromate passivation and citric acid passivation. Which bath and composition to use depends on the grade of stainless steel and prescribed acceptance criteria.
More resistant chromium-nickel grades can be passivated in a 20% by vol. nitric acid bath (Fig. 2). As indicated in the same table, less resistant stainless grades can be passivated by adding sodium dichromate to the nitric acid bath to make the solution more oxidizing and capable of forming a passive film on the surface. Another option, used in place of nitric acid plus sodium dichromate, is to increase the concentration of nitric acid to 50% by vol. The sodium dichromate addition and the higher nitric acid concentration both reduce the chance of undesirable flash attack. |
|
|
Figure 2 - Procedures for passivating stainless steel parts in nitric acid baths. Methods vary according to chromium content of the non-free-machining alloys treated, and according to the free-machinability characteristics of the alloys specifically identified. |
Nitric Acid Passivation of Stainless Steels |
|
|
Grades |
Passivation Practice |
| - Chromium-Nickel Grades (300 Series) - Grades with 17% Chromium or more (except 440 Series) |
20% by vol. nitric acid at 120/140°F (49/60°C) for 30 minutes |
| - Straight Chromium Grades (12-14% Chromium) - High Carbon-High Chromium Grades (440 Series) - Precipitation Hardening Stainless |
20% by vol. nitric acid + 3 oz. per gallon (22 g/liter) sodium dichromate at 120/140°F (49/60°C) for 30 minutes OR 50% by vol. nitric acid at 120/140°F (49/60°C) for 30 minutes |
|
Passivation for Free-Machining Stainless Steels Including |
|
|
|
|
The procedure for passivating free-machining stainless steels (also shown in Fig. 2) is somewhat different from that used with the non-free-machining stainless grades. That is because the sulfides of sulfur-containing free-machining grades are partially or totally removed during passivation in a typical nitric acid bath, creating microscopic discontinuities in the surface of the machined part. Even normally efficient water rinses can leave residual acid trapped in these discontinuities after passivation. This acid can then attack the surface of the part unless it is neutralized or removed. Free-Machining Stainless GradesTo effectively passivate the free-machining stainless steels, Carpenter has developed the A-A-A (alkaline-acid-alkaline) process, which neutralizes trapped acid. This method of passivation can be accomplished in less than two hours. Here is the step-by-step procedure: After degreasing, soak the parts for 30 minutes in a 5% solution of sodium hydroxide at 160°F to 180°F (71°C to 82°C). Then rinse the part thoroughly in water. Next, immerse the part for 30 minutes in a 20% by vol. nitric acid solution containing 3 ounces per gallon (22 g/liter) of sodium dichromate at 120°F to 140°F (49°C to 60°C). After removing the part from this bath, flush it with water, then immerse it in the sodium hydroxide solution for another 30 minutes. Rinse the part again with water and dry it, completing the A-A-A method of passivation. |
|
|
The benefits of using the alkaline-acid-alkaline method are demonstrated in Fig. 3. The left test cone clearly shows the improved surface and resistance of free-machining stainless steel when passivated by the A-A-A method. The visible result of conventional passivation can be seen in the right test cone. Citric acid passivation has become increasingly popular with fabricators who want to avoid the use of mineral acids or solutions containing sodium dichromate, along with the disposal problems and greater safety concerns associated with their use. Citric acid is considered environmentally friendly in every respect. It is on the GRAS (Generally Regarded as Safe) list compiled by the FDA as a material that is safe for people to handle. |
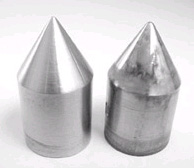 Fig. 3 - Test cone on left shows a bright finish with improved resistance of free-machining stainless steel when passivated using the A-A-A method. Result of conventional passivation is visible on the right. Both samples were exposed to salt spray. |
|
Although citric acid passivation offers attractive environmental advantages, shops having success with mineral acid passivation, and suffering no safety issues, might want to stay the course. There may be no real need to change if those fabricators have a clean shop, well-maintained and clean equipment, coolant free of iron-containing shop dirt, and a process that yields good results. Passivation treatment in citric acid baths has been found useful for a large number of stainless steel families, including several individual stainless grades, as summarized in Fig. 4. The conventional nitric acid passivation methods from Fig. 3 are included for convenience. Note that the older nitric acid formulations are in volume percent, while newer citric acid concentrations are in weight percent. It is important to note, in implementing these procedures, that a careful balance of immersion time, bath temperature and concentration is critical to avoid the "flash attack" described earlier. |
|
|
Figure 4 - Passivation with Citric or Nitric Acids |
|||||||
|
Stainless |
Example |
% Cr |
10% by weight Citric Acid - |
Percent Nitric Acid - |
|||
|
ºF |
pH(a) |
Process(b) |
Volume %(c) |
Process(b) |
|||
| Austenitic | CarTech 304/304L CarTech 316/316L CarTech Custom Flo 302HQ CarTech 305 Nitrogen strengthened |
15.0 - |
150 |
1 |
20% |
1 |
|
| Martensitic-PH | CarTech Custom 630 (17Cr-4Ni) CarTech Custom 450®stainless CarTech Custom 455®stainless CarTech Custom 465®stainless CarTech 15Cr-5Ni |
11.0 17.5 |
150 |
1 |
20% + Na2Cr2O7 |
1 |
|
| Ferritic | CarTech 430 |
>16 16 |
150 |
1 |
20% + Na2Cr2O7 |
1 |
|
| Ferritic | CarTech 409Cb |
<12 |
180-200 |
2 |
20% + Na2Cr2O7 |
1 |
|
| Martensitic | CarTech 410 CarTech 420 CarTech TrimRite® stainless |
<15 15 |
120-130 |
2 |
20% + Na2Cr2O7 |
1 |
|
| Austenitic-FM | CarTech 303 |
17-19 |
150 |
2 |
20% + Na2Cr2O7 |
2 |
|
| Ferritic-FM | CarTech 430F&CarTech 430FR |
>16 16 |
NA |
NA |
NA |
20% + Na2Cr2O7 |
2 |
| Ferritic-FM | CarTech Chrome Core® 18-FM |
>16 16 |
100 |
2 |
NA |
NA |
|
| Ferritic-FM | CarTech 409Cb-FM |
<13 13 |
110 |
5 |
2 |
20% + Na2Cr2O7 |
2 |
| Martensitic-FM | CarTech 416 |
<13 13 |
110 |
5 |
2 |
Preferred vs. citric |
2 |
| (a) pH adjusted with sodium hydroxide. (b) See Figure 5 (c) Na2Cr2O7 means add 3 oz/gal (22 g/l) of sodium dichromate to the 20% nitric acid. An alternative to this mixture is 50% nitric acid without sodium dichromate. The passivation treatment varies depending on chrome content and machinability characteristics of the grades in each family. Note the columns referring to Process 1 or Process 2. As shown in Fig. 5, Process 1 includes five steps – clean and degrease, rinse, passivate, rinse and dry. Process 2 includes seven steps – clean and degrease, rinse, passivate, rinse, neutralize, rinse and dry. |
| Figure 5 - Process Line-Ups Using Passivation Treatments from Figure 4 (above). | |
|
Process 1 |
Process 2 |
|
|
|
Laboratory tests have indicated that citric acid passivation procedures were more prone to "flash attack" than nitric acid procedures. Factors causing this attack included excessive bath temperature, excessive immersion time and bath contamination. Citric acid products containing corrosion inhibitors and other additives (e.g., wetting agents) that reportedly reduce sensitivity to "flash attack" are commercially available. Special procedures have been found necessary for the passivation of stainless steel beverage fittings. ASTM A967 criteria may not be applicable to free-machining stainless steels for such applications. A shop needing free-machining stainless bar for beverage fittings may seek technical assistance from his stainless steel supplier. The ultimate choice of passivation will depend on the acceptance criteria imposed by the manufacturer for whom the parts or components are to be made. For more information, refer to ASTM A967 "Standard Specification of Chemical Passivation Treatments for Stainless Steel Parts." The specification can be accessed at www.astm.org. Testing Passivated PartsTests are often performed to evaluate the surface of passivated parts. The question to be answered is, "Did passivation remove free iron and optimize the corrosion resistance of the free-machining grades?" It is important that the test method be matched to the grade under evaluation. A test that is too severe will fail perfectly good material, while one that is too lenient will allow unsatisfactory parts to pass. The 400 series precipitation-hardening and free-machining stainless steels are best evaluated in a cabinet capable of maintaining 100% humidity (samples wet) at 95°F (35°C) for 24 hours. The cross section is usually the most critical surface, particularly for free-machining grades. One reason for this is that the sulfides, elongated in the direction of working, intersect this surface. Critical surfaces should be positioned upward, but at 15 to 20 degrees from the vertical to allow any moisture to run off. Material that has been properly passivated will be virtually free of rust, although it may show some light staining. Austenitic non-free-machining stainless grades also may be evaluated by means of a humidity test. When so tested, liquid droplets of water should be present on the surface of samples, revealing free iron by the presence of rust formation. A faster method is available using a solution from ASTM A380, "Standard Recommended Practice for Cleaning and Descaling Stainless Steel Parts, Equipment and Systems." This test consists of swabbing the part with a copper sulfate/sulfuric acid solution, maintaining wetness for six minutes and observing whether there is any plating of copper. As an alternative, the part may be immersed in the solution for six minutes. Copper plating occurs if iron is dissolved. This test should not be applied to surfaces of parts for use in food processing. Also, it should not be used for the martensitic or lower-chromium ferritic stainless steels of the 400 series because false-positive results are likely. Historically, the 5% salt spray test at 95°F (35°C) also has been used to evaluate passivated samples. This test, too severe for some grades, generally is not necessary to confirm that passivation has been effective. Do's and Don'tsHere are some do's and don'ts that may help you passivate successfully:
|
Figure 6. Simple titration test for checking nitric acid concentration of passivating bath. This test should be performed at regular intervals.
Concentration of nitric acid (percent) in a passivating bath can be determined with this method of titration, assuming excessive iron contamination has not occurred.
Supplies
1. 0.5N standard sodium hydroxide solution (has limited shelf life).
2. Phenolphthalein indicator solution.
3. 1.0-ml pipettes, Class A.
4. 25-ml Schellbach burette with Teflon stopcock.
5. Burette support and clamp.
6. Casserole for acid sampling.
7. 250-ml Erlenmeyer flasks.
8. 4-ounce sample bottles.
Procedure
1. Use casserole to transfer acid from tank to sample bottle.
2. Measure 1.0 ml of nitric acid solution into a 250-ml flask containing 100 to 150 ml of a good grade of water (drinking water will suffice) and a few drops of the phenolphthalein indicator.
3. Swirl flask and add sodium hydroxide slowly from a burette until the solution remains pink at least one-half minute.
Calculation
ml titration X 3.24 = volume percent of nitric acid
NOTE: If the passivating solution contains sodium dichromate, the phenolphthalein indicator should be eliminated and the titration continuously monitored (pH meter) until a pH of 7.0 is obtained.
*******
By Terry A. Debold and James W. Martin
Carpenter Technology Corporation
Reading, Pa., USA